Tuesday, 13 March 2018

Working with Graph Explorer for first time


       Microsoft graph is a collection of APIs available in office 365. The idea is to have a single common way for accessing communicating with all the office 365 data. At this moment sharepoint rest APIs are superior in accessing the sharepoint data, which may change in future. 

Graph explorer is an online web tool which can analyze what data is available and its responses. The graph explorer can be accessed from the URL https://graph.microsoft.io/

Once visiting the link select on the , select the "Graph Explorer" from the top navigation bar to get a screen like below.


It is showing a sample query with the URL https://graph.microsoft.com/v1.0/me/ which will return the data about the current user on clicking the "Run Query" button, since I have not used my credentials it will show a sample data. The URL text box will show a good number Graph APIs available. 

 Once I sign in with my credentials by clicking on the left side button "Sign in with Microsoft", I will be able to see my real time data, I was prompted to login with my microsoft account which will have access to the tenant.( It would be advisable to use a non global admin account, even though the graph explorer is from MS). It will ask to accept the permissions needed by the Graph Explorer.


Once logged in , I just the ran query to fetch my information and it retreived as below.

To fetch information about my site collection I ran the below API query,
syntax: https://graph.microsoft.com/v1.0/sites/{hostname}:/{sitecollection relativepath}

For example if my hostname was mytenant.sharepoint.com and site collection url was mytenant.sharepoint.com/sites/xyz then my query needs to be as below


More queries for sharepoint and other office 365 components  are available in the following msdn link

Creating App Catalog in sharepoint online

1.       If you already have office 365 account you can proceed to step 2 , if not you can set up a trial version in office 365 in the below link
This will take a couple of minutes to configure the setup, it will be showing a screen similar to this while setting up


2.       Once the SharePoint setup is done we can navigate to the Admin center by selecting the “Admin” tile on the logged in page.

3.       Once you are inside the Admin page you can open the sahrepoint admin area by selecting the “SharePoint” under “Admin Centres” in the left pane.

Or you can directly access the SharePoint Admin Center by accessing the below URL : https://{tenant}-admin.sharepoint.com

4.       Once we are inside the SharePoint Admin Center the next step will be create an App Catalog, click on the link “app” on the left panel and select the “app catalog” from the new page.


5.       This will prompt an option to create a new app catalog or use an existing app catalog. If you are already having an app catalog you can proceed to select the second option provide the URL for the same. Here I will be setting up a new app catalog.


6.        In the next window the app catalog site Title and the web URL needs to be provided along with the administrator details. My window will look like this, I have used “myApps” suffix for my app catalog site.


Clicking OK will create the app catalog in 1 to 15 minutes depending on the server details. The site can be seen in the Sharepoint Admin Center.


Wednesday, 21 February 2018

Introduction to Microsoft forms

Microsoft Forms
1.       This is a new feature added to the office 365, this is available in your office 365 account.

2.       On selecting the link will take you to the Forms home screen ,there are two options  “New Forms” and “New Quiz”.

Lets just start on the New Forms


a.       First you need to create a category/ title  for the form, I am creating a “Tell us about yourself form” (I know I am very innovative 😉 )

You have an option to add a thumbnail image for your form.

b.       Now let us design a basic input form by clicking on the Add Question button.


c.       My form is going to Contain “Name”, “DOB”, “Gender”, “Do you Like Windows Forms” and “You availability”
Name  - Text

I have made this field Required and not a long answer. On the top right of the field we have the options to copy, delete, move the sequence up or down etc.
Gender  - Choice

Once I typed Gender system automatically prompted me with the suggestions, it understands few other things like “which day”, which month” etc.  I have selected “Add all” and it added all the options. Choice field do have an option of multiple answers, since it is not suitable for the context I am leaving it, once selected radio buttons will give way for check boxes.

DOB – Date


Availability – Likert


If we want to add additional feeling(options) we have a plus button. If your content is different you can add additional statements

How do you like windows forms -  Rating


We have multiple option to show rating as numbers or the stars, anyway I prefer the stars so I go with the stars.We have the option to select the rating out of 10 or 5.


Once you are done with the form we have the option to set who can respond and whether they can respond . The option is available from the “setting” on the menu on the right corner.


In the settings menu you have the option to Who can fillout the form and the timer period for accepting the results.


So  I am done with my form, so now we are good for sharing the form before that we can see the preview the of the form, how it looks.


Not Bad though 😉 . Now we are good to share it with others to get the feedback. We have multiple options to share the form with audience like QR code, send the link, send in email and iframe to embed in your page. Once the users starts giving responses you can see it from the Responses tab. The response screen is auto updated with the responses, we have the provision to export it to excel.Here is a sample response.


Sunday, 21 May 2017

Enabling Resource Reservation in Calendar List SharePoint 2013 and 2016

In sharepoint 2010 we had a great feature called resource reservation in calendar list which allowed us to reserve meeting with colleagues or book resources without double booking. But the feature has been removed from 2013.


There is a work around to enable the functionality in sharepoint 2013 and 2016. The below steps works with the on-premise as I am using the powershell for doing the same.


  • Activate the feature “Group Work Lists”, the feature is hidden by default. It can be enabled with powershell.
Enable-SPFeature –Identity “9c03e124-eef7-4dc6-b5eb-86ccd207cb87” –Url “http://dev/sites/First"
     
          This will create the “Resources” libraries where your resources entries can be created.

  • Enable the “share Member’s schedule from  List Settings > List Name, description and Navigation  , set the value to “Yes” and save.
  • Now we have to enable the resource reservation , again there is UI option for this one . We will have to do it with Powershell. Run the below script
$web= Get-SPWeb -Identity "http://dev/sites/First"
$Calendar=$web.Lists["ResourceCalendar"]
$calendar.EnableResourceSelector=$true
$Calendar.Update()


  • This will enable the resource allocation on the calendar list. :)


These I have tested in sharepoint 2013 and 2016 and confirmed working.


Tuesday, 15 September 2015

Creating Lookup column from Visual Studio 2012/2013

How to add the lookup column from the Visual Studio 2012 /2013 UI.

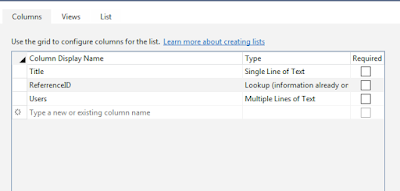
  1. Create the lookup column in the Visual Studio UI like below

  2. Go to the properties of the column(select column and press F4) and update the List and ShowField properties with the Target List URL and Column Name to be targeted.

Friday, 11 September 2015

Host Named Site Collection

Host-named site collections enable you to assign a unique DNS name to site collections for example http://MysiteA1.sharepoint.com. 

Host-named site collections can be created only through the Powershell command.


$web= Get-SPWebApplication "http://webApplication URL under which HNSC needs to be created"

New-SPSite "http://MySiteA1.Sharepoint.com" -OwnerAlias "Domain\UserName" -HostHeaderWebApplication $web -Name "MySiteA1"

This should ideally create your Host Named Site Collection. 

Sometimes it may give a warning on the powershell window like below


WARNING: The port specified for the new host header site does not match any known bindings in the specified Web Application. The new site will not be accessible if the Web Application is not extended to an IIS Web Site serving this port.


  1. Go to IIS Manager (type inetmgr from Run)
  2. Find the web application to which we have added the site collection.Right click on it and select Bindings


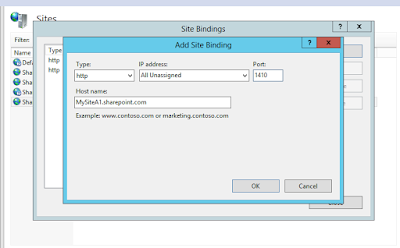
  3. Click "Add"  bindings to make an entry
  4. Click OK
  5. Open hosts file.(Type drivers from Run, within etc folder)
  6. Add an entry to the hosts for the site collection like below
  7. You will be able to browse your site after giving the URL(You may need to select the template). 
NOTE: If you are prompted credentials  again and again without allowing you login then you will have to disable loop back checking


Disabling Loop Back checks


When you use the fully qualified domain name (FQDN) or a custom host header to browse a local Web site that is hosted on a computer that is running Microsoft Internet Information Services (IIS) 5.1 or a later version, you may receive an error message that resembles the following:
HTTP 401.1 - Unauthorized: Logon Failed
This issue occurs when the Web site uses Integrated Authentication and has a name that is mapped to the local loopback address.

Note You only receive this error message if you try to browse the Web site directly on the server. If you browse the Web site from a client computer, the Web site works as expected.


  1. Click Start, click Run, type regedit, and then click OK.
  2. In Registry Editor, locate and then click the following registry key:

    HKEY_LOCAL_MACHINE\SYSTEM\CurrentControlSet\Control\Lsa
  3. Right-click Lsa, point to New, and then click DWORD Value.
  4. Type DisableLoopbackCheck, and then press ENTER.
  5. Right-click DisableLoopbackCheck, and then click Modify.
  6. In the Value data box, type 1, and then click OK.
  7. Quit Registry Editor, and then restart your computer.