Tuesday, 15 September 2015
Friday, 11 September 2015
Host Named Site Collection
Host-named site collections enable you to assign a unique DNS name to site collections for example http://MysiteA1.sharepoint.com.
Host-named site collections can be created only through the Powershell command.
Host-named site collections can be created only through the Powershell command.
$web= Get-SPWebApplication "http://webApplication URL under which HNSC needs to be created"

New-SPSite "http://MySiteA1.Sharepoint.com" -OwnerAlias "Domain\UserName" -HostHeaderWebApplication $web -Name "MySiteA1"
This should ideally create your Host Named Site Collection.
Sometimes it may give a warning on the powershell window like below
WARNING: The port specified for the new host header site does not match any known bindings in the specified Web Application. The new site will not be accessible if the Web Application is not extended to an IIS Web Site serving this port.
- Go to IIS Manager (type inetmgr from Run)
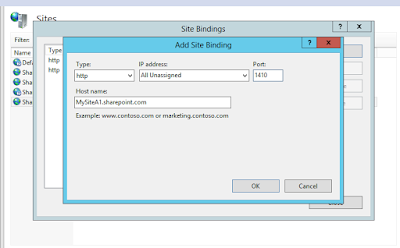
- Find the web application to which we have added the site collection.Right click on it and select Bindings
- Click "Add" bindings to make an entry
- Click OK
- Open hosts file.(Type drivers from Run, within etc folder)
- Add an entry to the hosts for the site collection like below
- You will be able to browse your site after giving the URL(You may need to select the template).
Disabling Loop Back checks
When you use the fully qualified domain name (FQDN) or a custom host header to browse a local Web site that is hosted on a computer that is running Microsoft Internet Information Services (IIS) 5.1 or a later version, you may receive an error message that resembles the following:
HTTP 401.1 - Unauthorized: Logon Failed
This issue occurs when the Web site uses Integrated Authentication and has a name that is mapped to the local loopback address.Note You only receive this error message if you try to browse the Web site directly on the server. If you browse the Web site from a client computer, the Web site works as expected.
- Click Start, click Run, type regedit, and then click OK.
- In Registry Editor, locate and then click the following registry key:
HKEY_LOCAL_MACHINE\SYSTEM\CurrentControlSet\Control\Lsa - Right-click Lsa, point to New, and then click DWORD Value.
- Type DisableLoopbackCheck, and then press ENTER.
- Right-click DisableLoopbackCheck, and then click Modify.
- In the Value data box, type 1, and then click OK.
- Quit Registry Editor, and then restart your computer.
Subscribe to:
Comments (Atom)


